
Add Months to Date
This article talks about how to add months to a date in Excel.

Updated:
May 20, 2022Ever wonder how the big manufacturing companies maintain a check on which customers to contact based on their accounts receivables? Most companies have an upper limit of 1-2 months from the date of service after which they must get paid including all the interest payable accumulated on the late payments to avoid high days sales outstanding (DSO).
This date can be determined with the help of the EDATE function on a month to month basis.
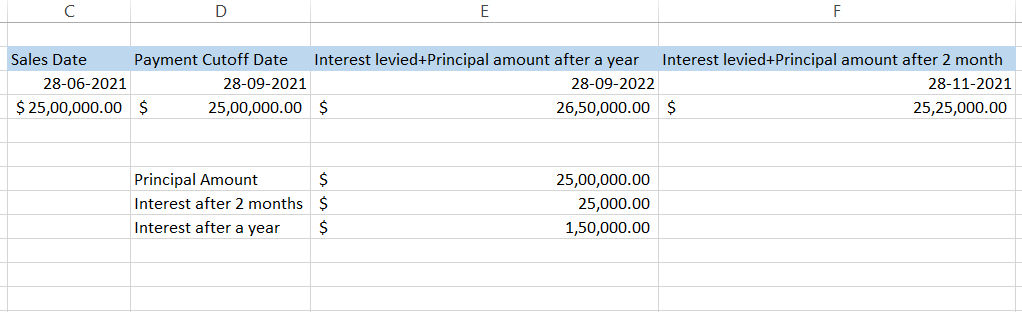
Suppose that your company manufactures the body parts for Tesla cars. You receive an order for $2,500,000 on 31st May 2021 from Tesla and send them the finished products by 28th June 2021.
As per your company policy, Tesla can pay for the services for up to three months after which they will be levied 6% on the outstanding amount (assuming the interest rate in Texas where your company and Tesla are based). By using the EDATE function, the deadline to make the payments without interest levied will be 28th September 2021. Similarly, the interest + principal amount receivable can be calculated once the future date to contact Tesla is established.
What is the EDATE function?
EDATE is a worksheet function categorized under the time and date functions of Excel that is used to get the same date in the past or future by changing n number of months. The date returned using the EDATE function are the serial numbers stored by Excel which is a specified date before or after the number of months indicated in our function.
By default, this serialization of date begins from January 1, 1990, which is considered as serial number 1, January 2, 1990, considered as serial number 2, and so on up to the serial number for 9th Feb 2022 which is 44601. The EDATE function is usually used to calculate the maturity dates, due dates, expiration dates of the product, and accounts payables and receivables.
For example, if the product is manufactured on 10th January 2020 and has an expiration period of two years, then the expiration date of the product as per the EDATE function will be 10th January 2022.

Syntax for EDATE function
The syntax for the EDATE function is:
=EDATE (start_date, months)
where,
- start_date = It represents the start date for the function from which we expect to get the same date in the past or future. It is a required field in the function.
- months = The number of months before or after the specified start_date that we expect to return. A positive value will give you the future date while a negative value will give you the past date.
Note: You can use the DATE function to add start_date in your formula to avoid errors.

Sign Up for our Free Excel Modeling Crash Course
Begin your journey into Excel modeling with our free Excel Modeling Crash Course.
How to use EDATE function
EDATE is an in-built function in Excel and hardly requires any special expertise to use it. You begin by inserting the function in the cell using the equal sign (=) and add the start_date and month arguments in the function.
Adding months to date
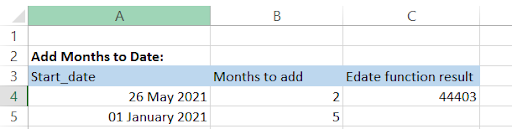
Let's assume that you have two different start_dates and months to be added as the table below:

The formula that you will be using is =EDATE(A4, B4) which will give you the result in serial number format for the date as illustrated below:
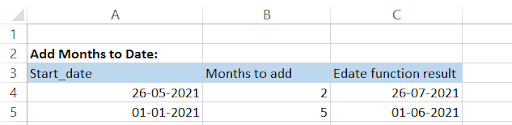
Now all you need to do is click on the home tab and select the cell value format as Short date. You can also use the keyboard shortcut of Alt + H + N + S and press Enter or Ctrl + 1 to open the format cell dialog box and select the required date format. Your table will look as follows:
Subtracting months from date
We saw how a positive value for the date gave us the future date. Now, how do we get the past dates?
You might have already guessed it and yes you are absolutely correct. The formula that we will be using here is =EDATE(A9, -B9) which gives us the following result:

Now you could represent the negative sign in the formula itself or if you have the month values in a different cell then you can represent them as negative values and use the usual formula, i.e., =EDATE(A9, B9) without any negative sign.

Adding years to date
As the function allows us to add months to dates, you can tweak the formula a bit to make it able to add future or past dates in x years. All you have to do is multiply the month (which will be represented as a year when calculating the future or past x years) by 12 and you will get the result.
For example, we need to add two and five years respectively to the dates in the Start_date column.

You will be using the formula =EDATE(A14, B14*12) which basically means (2 months x 12 months = 24 months, i.e., 2 years) to give you the result as:

Subtracting years from date
By this section, we hope that you have already crossed the intermediate level of understanding for this topic. You might have guessed the correct formula for calculating the date in the past x years which is =EDATE(A19, -B19*12). Your spreadsheet after adding the negative sign in the formula will look like this:

EOMONTH function
EOMONTH is a similar worksheet function to EDATE such that by adding or subtracting the months it gives us the x years in the future or the past. However, the difference between both the functions is that EOMONTH usually returns the end of the month date no matter what date you use to return the future of past x year.
Syntax for EOMONTH function
The syntax for the EDATE function is:
=EOMONTH (start_date, months)
where,
- start_date = It represents the start date for the function from which we expect to get the month-end date in the past or future. It is a required field in the function.
- months = The number of months before or after the specified start_date that we expect to return. A positive value will give you the future date while a negative value will give you the past date.
WSO's Pro-tip
You can use the DATE function to add start_date in your formula to avoid errors.
Using the EOMONTH function
Begin using the function by using the equal sign (=) and type EOMONTH to fill the two arguments of the function.
Adding and Subtracting months to/from date
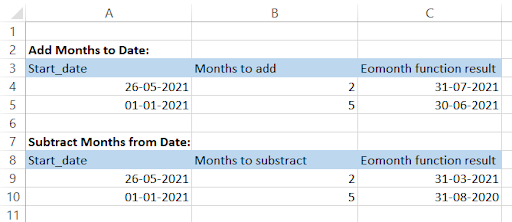
Assume that you have two different dates to which you need to add and subtract two and five months respectively.
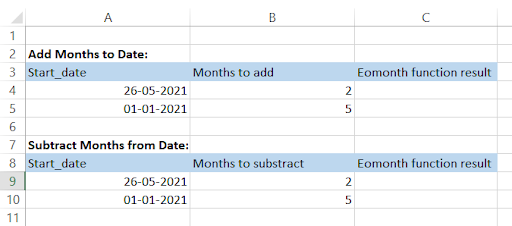
The formula that you will be using for adding the months to date is =EOMONTH(A4, B4) while for subtracting it is =EOMONTH(A9, -B9). Using both the formula will give us the month-end dates x years in the future or the past.
Your spreadsheet should look as follows:
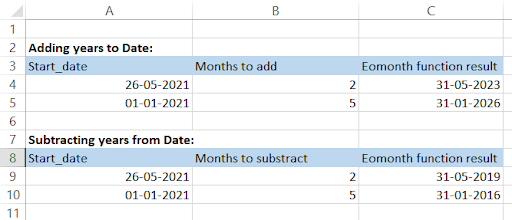
Adding and Subtracting years to/from date
Similar to the logic used in the EDATE function, i.e., multiplying the month argument by 12 will give you the future or past date as per the month argument in the function.
For example, to get the month-end date for 26th May 2021 and 1st January 2021 in two and five years periods respectively we will use the formula =EOMONTH(A4, B4*12) in the spreadsheet. If we need to get the past date then we will use the formula with a negative sign as =EOMONTH(A9, -B9*12).
Our table after using the formula will look like this:
Practical Example #1
So let's say you are working on one of the projects that you need to submit to the client. Since the project is time-sensitive (you only have 2 months to complete it), your colleague suggests you make a tracker based on what work you achieve on the project each day.
This is what the basic format for the tracker looks like:
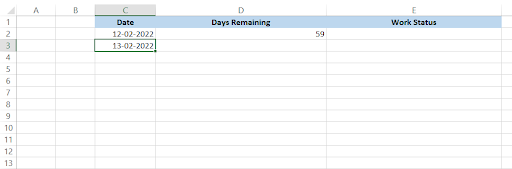
The days remaining column is the crucial part of the tracker and will consist of the formula that will calculate the days remaining up to the end of two months (our deadline). Cell D2 will have the formula =EDATE($C$2, 2) - C2.
This basically means we are subtracting the future date with the beginning date to give us the days between them. Cell C3 consists of the formula =C2 + 1, i.e., it increases the next date by 1 day in sequence. This is where things change.
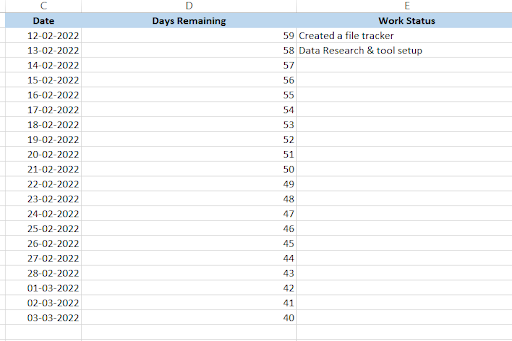
We won't be dragging the formula in cell D2 down. Instead we will be adding another formula which is =IF(C3>C2, EDATE($C$3, 2) - C3 - 1, ""). This formula acts as insurance in your tracker such that if today's date is not greater than yesterday, it will leave the cell blank (no reasons should be left to mess up while working on important projects).
If today's date is greater, then one day will be subtracted from the difference between the EDATE function result and the working date. Since we have frozen the C3 cell in the EDATE function, the days remaining go on decreasing until it becomes zero on 12-04-2022. This is what the spreadsheet looks like:
Practical Example #2
To all the HRs out there, this one is for you. So assume this is what your employee database looks like:
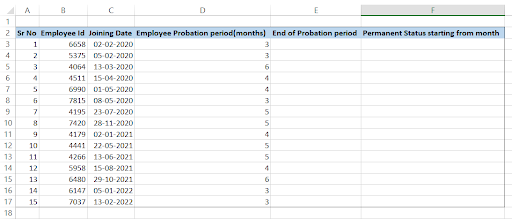
You need to determine at what date will be the end of the employee probation period based on the value in column D and when will they get the status as a permanent employee. This spreadsheet model incorporates both EDATE and EOMONTH functions in columns E and F respectively.
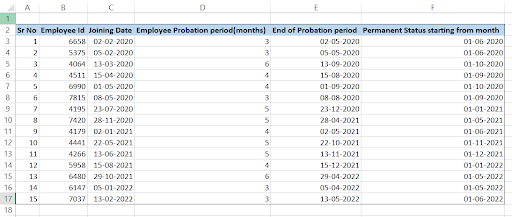
The formula you will be using in column E will be =EDATE(C3, D3) while in column F it will be =EOMONTH(C3, D3)+ 1. Since EOMONTH gives us the last date of the month in future x years, adding 1 to the formula gives us the first date of next month. This is what our spreadsheet looks like after dragging down the formula:
Sign Up for our Free Excel Modeling Crash Course
Begin your journey into Excel modeling with our free Excel Modeling Crash Course.

or Want to Sign up with your social account?